Beyond numpy’s usefulness in creating arrays and matrices, numpy also provides a great suite of math functions that – for anyone with any programming background – are fairly intuitive.
Here are some examples:
np.pi returns pi and np.sqrt() takes the square root of whatever value you feed it.
Trig Functions
numpy handles most common trigonometry functions.
Stats
Numpy handles many statistics functions.
Below we have mean and median. Unfortunately, just like in R, there is no mode command, but we can fake it using Set.
using set to fake mode
Numpy can also be used to find range, variance, and standard deviation.
Rounding
Numpy has rounding features for dealing with decimals. It also has floor() and ceil() functions that bring the number down to the “floor” or up to the “ceiling”
Use in creating graphs
use np.sin()
use np.log()
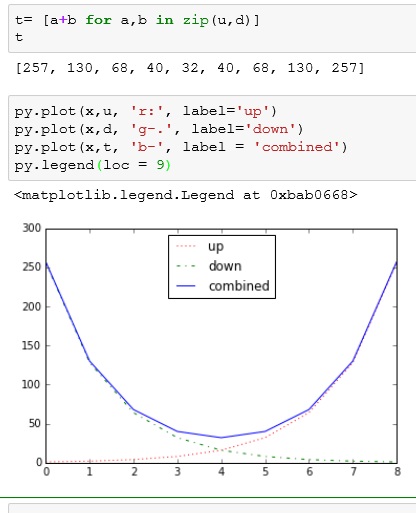
you can even put the two together
linspace()
My final one today is a function called linspace(). It lets you create a start and finish point, and how many elements you want. It then will create a even list of number between start and finish.
linspace(start,finish, num=numbers you want)
If you enjoyed this lesson, click LIKE below, or even better, leave me a COMMENT.
Today we are going to cover what I consider a flaw in the iPython Notebook environment. Code you write cannot be imported into another program like you can using just a standard Python compiler. At least it cannot under its native .ipynb format.
For this example, we are going to use the Spyder IDE that comes with Anaconda. You can use any IDE you want, in all honesty, you can use a simple notepad editor to do this if you don’t have Spyder installed.
Create a Module
I am going to create a little module called math_bl.py. This module contains 3 simple functions: sqr2, sub2, and add2
In my instance, my iPython notebooks are stored under my user directory. If you are not sure where you notebooks are, you can use the pwd command (print working directory). This will tell you where to save your math_bl.py file to.
** note the double \\ are due to a formatting function in Python. \ is a break command that can be used for many purposes. Example \t means to insert a tab.
So effectively you have to use \\ if you want a \ in Python, making my working directory C:\Users\Benjamin
Import the Module
Now if I open up a new notebook and try using the functions I have just created, I will error out.
So, what I need to do is import add2, then I can start calling on the functions I created in add2
If you enjoyed this lesson, click LIKE below, or even better, leave me a COMMENT.
No matter how well crafted your code, you will inevitably come across an error every once in a while. Unfortunately, Python’s default setting when catching an error is to crash the program.
In the example below, I accidentally asked for a letter, when the code int(input()) is looking for an integer.
So when I enter a string, I get an error
Try your code in our online Python console:
Try
Using Try, we can handle such mishaps in a more elegant fashion
The syntax is a follows:
try:
        Your Code
except:
         What to do if your code errors out
else:
         What to do if your code is successful
And as you can see from above, it doesn’t just protect against code errors, but it protects against user errors as well.
Using a while loop, we can give the user another chance if they don’t enter a number the first time.
Code explanation
while True: – starts an infinite loop
continue – returns to the beginning of the while loop
break – exits the loop
Try your code in our online Python console:
Finally
You can add the finally: command to the end of a try: statement if you have something you want to execute regardless of whether there was an error or not.
Try your code in our online Python console:
Exception types:
You can also determine what your program does based on the type of error
The basic Print statement in Python is Print (“”) – note Print (”) also works. You can choose either single or double quotes, but you cannot mix them in the same statement.
Print Variables
Printing variables by themselves is pretty straight forward:
Printing variables in line with some text is a little more complicated:
If the variable you want to print is a number, use the special string %d inside the quotes and % variable outside the quotes.
If you have more than one variable, you need to have a %d for each variable. Then place your variables inside () at the end of the print line.
To print a string, you use %s. Notice below you can mix strings and numbers in the same line.
You can use %r if you are not sure what value the variable will have. It will print both.
Try your code in our online Python console:
User Input
input() allows you ask the user for input.
You can assign the user input to a variable.
You can also pre-define what kind of input you want.
If I enter a string I get an error
But If I enter an integer, I do not get the error.
Before we continue onto Dataframes, I want to clear up something from the Series exercise. Note the line (from pandas import Series, DataFrame)
Using that line, I can call upon Series or DataFrame directly in my code
In this example below, I did not directly import the methods Series and DataFrame, so I when I tried x = Series() I go an error.
I had to use the full method name of pd.Series() for this to work.
DataFrame
DataFrames provide another level of data management for Python. Those of you who come from a more data driven background with appreciate DataFrames.
Let’s start by creating dictionary.
Now, pass the dictionary to the method DataFrame()
Note, now you have a table looking structure with named columns
You can call up a list of indexes or columns using the methods below:
DataFrame.info() will return a summary of your DataFrame
Head and Tail
Create a new DataFrame from a dictionary
If you want just see a few of the first elements, you can use the head() method
The tail() method does the last few. You can even choose how many rows you want.
Describe
The describe() method gives you some quick statistics on any numeric column
Slice
You can slice a DataFrame just as you would a list
Choose What to Display
DataFrames allow you to filter what rows to display by value or column
There is a lot more you can do with Series and DataFrame in pandas, and we will be covering them in later lessons. For now though, I think you have a general idea.
If you enjoyed this lesson, click LIKE below, or even better, leave me a COMMENT.
First off, CONGRATS for making it this far. Numpy really signifies the first step in real data science with Python.
Numpy is a library that adds advanced mathematical capabilities to Python. If you are using the Anaconda release of iPython, you already have numpy installed. If not, you will need to go over to their site and download it. Link to numpy site: www.numpy.org
Numpy adds multi-dimensional array capabilities to Python. It also provides mathematical tools for dealing with these arrays.
Array
What is an array? In different programming languages, arrays are equivalent to lists in Python. In fact, a single dimension array in Python can be used interchangeably with lists in most cases.
What makes arrays special in Python is the ability to make multidimensional arrays. Those who have taken math courses like Linear Algebra will better know multidimensional arrays by the term matrix. And if you paid attention in Linear Algebra, you will know there is a lot of cool things you can do with matrices.
For those who didn’t take Linear Algebra (you probably went out and made friends and had a social life), don’t worry, I will fill you in on what you need to know.
Numpy
Let’s start by creating a single dimension array
import numpy as np — imports numpy into your notebook, we set the alias to np
x = np.array([8,7,4]) — array is a method of np, so the syntax is np.array. **note the [] inside the ()
x[1] = you call array just like lists
x.shape = shows you shape of your array, since we are single dimension, the answer is a single number – **note 3L – the L indicates integer in Python
Now let’s make a 2 x 3 matrix. When describing a matrix (or multi-dim array) the first number indicates the number of elements across and the second number indicates down. This is standard mathematical notation.
You can see I create a new row by enclosing the number sets in [] separated by a ‘,’
Now when want to call an item from the multi-dim array, you need to use 2 index numbers. y[0,1] = y[row, column]
np.arange()
np.arange() is a command we can use to auto populate an array.
np.arang(5) –create a one – dim array with 5 elements
np.arange(10).reshape(2,5) – reshape lets you convert a one-dim array into a multi-dim array
Transpose
Transposing a matrix means flipping it on its axis. This comes in handy in applications like multi-variate regressions. To transpose our array in Python, we use the “.T” method
dot Product
Performing a dot product on a matrix is a useful calculation, but it is very time consuming. Numpy makes it easy though.
Outside of beings incredibly fun to say, Kwargs and Args can be pretty useful.
Here is how they work. Let us say you wanted to make a function that adds 4 numbers:
Notice what happens when we only provide 3 arguments, we error out. The same thing happens if we try to give the function 5 arguments.
Well, if the world perfectly predictable, this wouldn’t be an issue. But in the real world, making a function that adds 4 and only 4 numbers isn’t very useful. A function that can add any given set of numbers however is very useful.
*args
*args to the rescue
Using the keyword *args inside the function parenthesis gives you the flexibility of having as many, or as few arguments as you want.
Try your code in our online Python console:
**kwargs
Kwargs are basically args with keywords. Think dictionaries.
You can combine regular arguments with *args and **kwargs
Try your code in our online Python console:
If you enjoyed this lesson, click LIKE below, or even better, leave me a COMMENT.