MS SQL Server: Database Diagrams

MS SQL Server comes with a function called Database Diagrams. You can use it to produce ERDs (Entity Relationship Diagrams).

Start by right clicking on Database Diagrams > New Database Diagram in the Object Explorer

sqlJoin

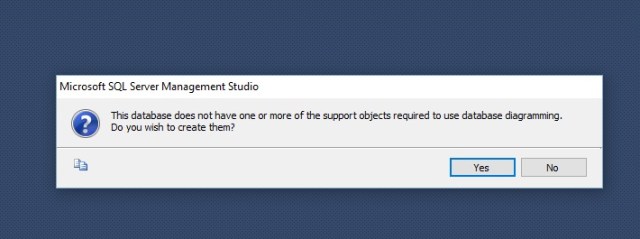
If you get the following error, you database does not have an owner assigned.

sqlJoin1.jpg

To assign an owner, right click on your database name and select Properties

sqljoin2

Under Select a page > FilesBy Owner select radio button> Browse

sqlJoin3

Select your user name from the list and then hit Okay until you are back to the main screen.

sqlJoin4.jpg

Right click Database Diagrams > New Database Diagram

sqlJoin

Click Yes

sqlJoin5

Now select some tables. In this example, I am choosing Employee and SalesPerson

sqljoin6

The diagram shows the tables you picked, and the data fields. It also shows connections.

sqlJoin7.jpg

Notice the tables do not all connect directly with each other. Another point to take note of is the small yellow keys located in from of some fields. These let you know that those fields are the primary key(s) for their respective table. The primary key is the unique identifier for the table.

sqlJoin8

SQL: Aggregates, Group By, and Having

The Where clause is great. It helps you filter out items from a table, leaving only the records you want. But sometimes you are not looking for the actual records. Instead, sometimes you only want to know how many records.

In this example, I will using the [HumanResources].[EmployeeDepartmentHistory] from AdventureWorks2012:

sqlAggr.jpg

Count and Group By

The Count(*) function is used to count the number of rows.

Now, when we combine count(*) with a Group By clause, we can count how many records exist for each element in our group by clause.

All non aggregate columns in the select statement need to be in the group by function or you will get an error.

The code below counts the amount of rows containing each departmentID

sqlAggr1

Having

Run the following query:

select BusinessEntityID, count(*) as amt
from [HumanResources].[EmployeeDepartmentHistory]
group by BusinessEntityID

You will get a list 290 records long. Most of these records will have a 1 in the amt column (meaning there is only one records containing the BusinessEntityID referenced)

If you want to know how many BusinessEntityIDs in this table have more than one record, we just have to add the Having clause to our query.

sqlAggr2

having can only be used in conjunction with aggregate functions.

Min(), Max()

Min and Max return the minimum and maximum of whatever column you you place in the parenthesis

sqlAgg4


SQL: Where Clause

The Where clause in SQL works as a filter. In this lesson we will be using MS SQL Server and Microsoft’s free database example Adventure Works 2012.


If you want to follow along with the exercises:

MS SQL Server installation instructions here: MS SQL Server: Installation

Instructions for loading Adventure Works: SQL: SELECT Statement


We are going to be using some selected fields from the table HumanResouces.Employee in the AdventureWorks2012 database.

sqlwelcome.jpg

Find single value

Let’s use Where to find the record with the BusinessEntityID of 6:


SELECT [BusinessEntityID]
,[JobTitle]
,[BirthDate]
,[MaritalStatus]
,[Gender]
,[SalariedFlag]
FROM [AdventureWorks2012].[HumanResources].[Employee]
Where BusinessEntityID = 6


To find a single matching numeric field, use Where Field = Number

You can also use the following operators

  • = equals
  • > greater  than
  • < less than
  • != not

Look for String

To find a string value, we are going to use the Like keyword: Where Field like ‘String’


SELECT [BusinessEntityID]
,[JobTitle]
,[BirthDate]
,[MaritalStatus]
,[Gender]
,[SalariedFlag]
FROM [AdventureWorks2012].[HumanResources].[Employee]
Where JobTitle like ‘Design Engineer’


Using a Wildcard

When trying to search by part of a string, we use the % wildcard.

Consider the sentence “Dogs love chasing cats”

  • ‘Dog%’ = “Dogs love chasing cats”
  • ‘%cats’ = “Dogs love chasing cats”
  • ‘%love%’ = “Dogs love chasing cats”

Below we use a wildcard to find all job titles that end in Engineer


SELECT [BusinessEntityID]
,[JobTitle]
,[BirthDate]
,[MaritalStatus]
,[Gender]
,[SalariedFlag]
FROM [AdventureWorks2012].[HumanResources].[Employee]
Where JobTitle like ‘%Engineer’


Between

The Between keyword can used to find records that fall between 2 values


SELECT [BusinessEntityID]
,[JobTitle]
,[BirthDate]
,[MaritalStatus]
,[Gender]
,[SalariedFlag]
FROM [AdventureWorks2012].[HumanResources].[Employee]
Where BusinessEntityID between 5 and 20


And, Or

This query returns all Married employees who are Female


SELECT [BusinessEntityID]
,[JobTitle]
,[BirthDate]
,[MaritalStatus]
,[Gender]
,[SalariedFlag]
FROM [AdventureWorks2012].[HumanResources].[Employee]
Where MaritalStatus = ‘M’ and Gender = ‘F’


This returns all employees who are married or employees who are F regardless of martial status


SELECT [BusinessEntityID]
,[JobTitle]
,[BirthDate]
,[MaritalStatus]
,[Gender]
,[SalariedFlag]
FROM [AdventureWorks2012].[HumanResources].[Employee]
Where MaritalStatus = ‘M’ or Gender = ‘F’


()

Parenthesis are used just like your remember from Algebra class. They state that the items inside must performed first.

This query returns all Married Males as well as all Tool Designers regardless of gender or marital status.


SELECT [BusinessEntityID]
,[JobTitle]
,[BirthDate]
,[MaritalStatus]
,[Gender]
,[SalariedFlag]
FROM [AdventureWorks2012].[HumanResources].[Employee]
Where (MaritalStatus = ‘M’ and Gender = ‘M’) or JobTitle like ‘Tool Designer’


If you enjoyed this lesson, click LIKE below, or even better, leave me a COMMENT. 

Follow this link for more SQL content: SQL

SQL: SELECT Functions (Top, Count, Distinct, Max, Min)

I introduced you to the SELECT statement in SQL in my last SQL posting: SQL: SELECT Statement

Now I am going to show you some tricks that will provide you with more functionality in your Select statements.

**note, in the examples below, I am working with the HumanResources.Employee table from the AdventureWorks2012 data set. If you want to follow along with the exercises, go to my previous SQL posting: SQL: SELECT Statement where I show you how to download and attach the AdventureWorks2012 database.

Top

Top allows you to limit the number of rows that are returned. (note Top is a T-SQL (Microsoft’s version of SQL command. MySQL and Oracle use the term Limit).


Select Top 10 *
from HumanResources.Employee
go

Using Top 10 we are querying only the first 100 records from the Employee table. This is often useful when you are exploring a database and just want to see what is in a table. Using Select * in some larger tables without using the Top command to limit the amount of output can result in a query that could take minutes to hours to complete.

Note that the query above returns the first 10 records based usually on the order records were entered. If you want to top 10 newest employees you would need to add an Order By command.


Select Top 10 *
from HumandResources.Employee
order by HireDate desc
go

The order by command sorts the results by the dates in the column HireDate in descending order (desc) most recent to earliest. If I wanted to go the other way, I would use the command: order by HireDate asc – ascending(asc)

Count()

If yon want a count of the number of records in a table, SQL has a Count() function. The syntax is below.


Select Count(*)
from HumandResources.Employee
go

This returns the number of records in the table. If you wanted to know how many male employees are in the table, you can add a Where clause (I will cover Where more in-depth in later lessons)


Select Count(*)
from HumandResources.Employee
where Gender like 'M'
go

Distinct()

Notice how there are repeated JobTitles in the table below. What if you wanted a list of job titles without any repeating elements.

sqlSelect14

In this case, you will use the Distinct() function. Placing the column you want in the parenthesis and the query will return a non repeating list.


Select Distinct(JobTitle)
from HumandResources.Employee
go

Now, what if you want to know how many distinct job titles exist in the company. Well, we can use the Count() function in conjunction with Distinct()


Select Count(Distinct(JobTitle))
from HumandResources.Employee
go

The query above will return a count (number) of the distinct job titles found in the table

Max() and Min()

Max() and Min() do pretty much what you would expect them to do. They return the maximum or minimum value in column.


Select Max(HireDate) as Max, Min(HireDate) as Min
from HumandResources.Employee
go

** “as” command in a Select statement gives a name to result columns in query


If you enjoyed this lesson, click LIKE below, or even better, leave me a COMMENT. 

Follow this link for more SQL content: SQL

SQL: SELECT Statement


SELECT is doubtlessly the most important command in SQL. A database is completely useless unless you can query the data it is holding. SELECT is how we query.


If you want to follow along:

You will need MS SQL Server installed. Here is a link to instructions: InstallSQL

Microsoft provides a great sample database known as Adventure Works. I am working with the 2012 release. You can download it here: AdventureWorksDownload


Once you have Adventureworks downloaded, you will need attach it to SQL Server.

Copy and paste the download file to somewhere you can find it. I recommend:

C:\Program Files\Microsoft SQL Server\MSSQL12.MSSQLSERVER\MSSQL\DATA

** the portion in red changes based on what version of SQL Server you downloaded. 

sqlSelect

Open SQL Server Management Studio. Windows Key + R – Type SSMS

sqlinstall2

Login to your server

sqlinstall3

Go to Object Explorer – Right Click Database > Attach…

sqlSelect1

Click Add…

sqlSelect2

Select Adventureworks2012_Data.mdf

sqlSelect3.jpg

In the bottom window, highlight the log file and click Remove. Then Click Okay

sqlSelect4.jpg

Go back to Object Explorer. Expand Databases > AdventureWorks2012 > Tables

sqlSelect6

Just picking a table at random, I selected HumanResources.Employee. Let us see what is in the table. Click the New Query button up top, and a new query window will open.

sqlSelect7

Make sure you are working with the right database. Select AdventureWorks2012 from the drop down:

sqlSelect17

Cut and Paste the following into the new query window.


select *
from HumanResources.Employee
go

select JobTitle, BirthDate, Gender, HireDate
from HumanResources.Employee
go

select JobTitle as Job, BirthDate as DOB, Gender, HireDate as [Start Date]
from HumanResources.Employee
go

select HireDate as [Start Date], JobTitle as Job, BirthDate as DOB, Gender
from HumanResources.Employee
order by HireDate
go
select HireDate as [Start Date], JobTitle as Job, BirthDate as DOB, Gender
from HumanResources.Employee
where gender like ‘F’
order by HireDate
go


One cool thing about SQL code is that you can select only the  code you want to execute

Highlight the first group of code and click the ! Execute button

sqlSelect8

Syntax

  • Select * – Select all fields in the table. “*” is a wildcard in SQL
  • from HumanResources.Employee – this is the table we want to work with
  • go – this indicates and end to the code block. It is not needed when executing code block by block (like we are doing here), but it is a good practice to get in the habit of adding it

Notice the results show every field in the table. It displays in a spreadsheet like table

sqlSelect9.jpg

Now Select the next code group  and click ! Execute

sqlSelect10

Syntax

  • select JobTitle, BirthDate, Gender, HireDate – Here we are selecting four specific columns from the table
  • The rest is same as above

Results show the 4 columns selected above

sqlSelect14.jpg

Next block of code – click ! Execute

sqlSelect11.jpg

  • select JobTitle as Job, BirthDate as DOB, Gender, HireDate as [Start Date] – In this case, we use the “as” command to give the field names more User friendly names

Note the column names have changed

sqlSelect15.jpg

Next block of code – click ! Execute

sqlSelect12

syntax

  • select HireDate as [Start Date], JobTitle as Job, BirthDate as DOB, Gender – here we reordered the fields so that HireDate appears first
  • order by HireDate – this SQL for Sort by. The results will now be ordered by HireDate

Notice Start Date(HireDate) is now the first column and the records (rows) are sorted in order from oldest Start Date to newest

sqlSelect16.jpg

FInal block of code – click ! Execute

sqlSelect13

Syntax

  • where gender like ‘F’ – here we are filtering the results to only ones were Gender is F.

Note now only Female employees are in the results

sqlSelect18


If you enjoyed this lesson, click LIKE below, or even better, leave me a COMMENT. 

Follow this link for more SQL content: SQL

MS SQL Server: Installation

When it comes to SQL Server for personal use – (i.e. training, education) Microsoft offers two options:

  • SQL Server Express: This option is free, but is surprisingly robust. This is the version I cut my teeth on.
  • SQL Server Developer Edition – which you can find online at around the $60.00 price point. This edition is worth the money as it comes with everything  (SSIS, SSRS, etc.) Unfortunately you will need to purchase from a 3rd party vendor because as of the time of this writing, Microsoft is not currently selling it.

For this tutorial, we will focus on Express:

Here is the link for SQL Server Express: Download Link

The screen below explains the options available. You will want – at minimum – to install SQL Server Express with Tools. I would recommend SQL Server Express with Advanced Services.

Select the download arrow my red arrow is pointing to and you will be asked to sign in with your Microsoft Account. (If you don’t have one, do not worry, they are free – sign up for it).

sqlinstall


On the next screen, choose your version and language. Make sure you choose 64 or 32bit. If you don’t know what version Windows you are running. Go to your Control Panel > Admin Tools > System Configuration You will find your system version there.

sqlinstall1

Once the file downloads, just run it like a regular MSI. The only thing you really may not have seen before is asking for authentication method. I always go with Mixed Mode (just make sure to remember the SA password you put in).

If you are having trouble, here is a good You Tube Tutorial for a step by step installation: Link to Video

Okay, now we have SQL Server installed, let’s use it.

Starting SQL Server Management Studio

SQL Server Management Studio is how you will interact with SQL Server.

To open it up, hit Windows Key+R. In the run box type SSMS.

sqlinstall2.jpg

Since you are trying to connect to the SQL Server you just installed on your computer, enter localhost as Server name. Choose Windows Authentication and hit connect.

sqlinstall3.jpg

Let’s Make a Database

Once SQL Server Management Studio opens, go to the Object Explorer and right click Databases > New Database

sqlinstall4.jpg

Let us name the new database SQLIntro and hit okay. Don’t worry about other options at this point.

sqlinstall5

From the top bar, select New Query

sqlinstall6

Copy and Paste the following script into the Query window that just opened up. Don’t worry about the code at this point. Just know:

  1. Use SQLIntro – tells us to use the database we just created
  2. Create table — we are creating a table called FirstTable with 2 columns Name and Age
  3. We are inserting data (names and ages of 4 people) into our new table

Copy the script below:


Use SQLIntro
go

Create table FirstTable
(Name nvarchar(255),
Age int)
go

Insert into FirstTable (Name, Age)
values (‘Ben’, 40), (‘Chris’, 45), (‘Patrick’, 32), (‘Jordan’, 18)
go


After you paste the data, hit Execute!

sqlinstall7

Let’s See Our Data

Go to Object Explorer:

  1. Databases — note you will not have as many databases as you see here. This is my SQL Server I have been working with for the past 3 years.
  2. SQLIntro
  3. Tables
  4. Right Click dbo.FirstTable
  5. Select Top 1000 Rows

sqlinstall8.jpg

And there you have it, the contents of your first table in your first SQL Server Database

sqlinstall9.jpg


If you enjoyed this lesson, click LIKE below, or even better, leave me a COMMENT. 

Follow this link for more SQL content: SQL

SQL: Getting Full Days Worth of Data

From a real work example:

I get a weekly data file of patient alarm data. This data is collected continuously throughout the day. However, the data must be exported manually and is usually done in the middle of the day. So the first and last data samples in my set could be taken at 14:41 one week apart. Since I only want to have full days worth of day, I like to truncate the data at midnight – deleting any partial days from the data set.

Instead of having to manually look at the data and determining when to cut off my data, I wrote the following simple script.

SQLDate

This script takes advantage of SQL’s variable functionality. Notice you need to declare your variables ahead of time. One thing to keep in mind is that variables only exist within their scripting block. Meaning once you are done executing this block of code, the variables are dropped from memory and no longer available to further code blocks.

I set the variables value using an inline Select statement. The nested function in the Select statement reads like this:

 convert(date, (dateadd(dd,1,min(dateField))))

It is actually a combination of the following functions – by order of operation:

Dateadd()

dateadd(dd,1,min(dateField)) = add 1 day(dd) to the minimum date (min(dateField)) in the table ** the dateadd function always starts at 12:00 AM when adding or subtracting a day

Convert()

Convert the value from Dateadd() above to the Date format.

Finally:

Delete from Table1
where dateField not between @start and @end
go

This final block of coat deletes every record in NOT in between the dates represented by the @Start and @End variables

SQL Code

declare @start date
declare @end date

set @start = (select convert(date,(dateadd(dd,1,min(dateField)))) from Table1)
set @end = (select convert(date,(dateadd(dd,0,max(dateField)))) from Table1)

delete from Table1
where date not between @start and @end
go


Automating Data Preparation with SQL Server

Download the Excel file here: Data Cleaning with SQL
Download the SQL file here: Data Cleaning with SQL
**Zip Folder contains the SQL file as both an SQL file and Txt for easy
viewing by people who don't have SQL Server installed 

Data preparation and cleaning is not a lot of fun. Data preparation is especially irritating when you have to repeat the task over and over again. While no one has come up with a data cleaning magic wand that I am aware of, there are some ways to automate the dreaded process.

While there are many software offerings out there that can help you with data cleaning, some are very expensive and have a high learning curve. So in this article I am going to focus on SQL Server. I chose SQL Server for the following reasons:

  • SQL programming is vital skill to have if you want to work in data
  • SQL Server readily available. Many  companies have it. If you don’t have access to a current SQL Server, you can download the Express version for free.

The Problem

You work for a university and scheduling software is sorely out of date. The reporting capabilities are limited to 4 pre-canned reports. There is no money for an upgrade, but your boss is asking you for some reports that are not available from the system.

So you go to extract some data from the outdated software, but the program only lets you extract the following 4 columns (Start Date, Class, Professor, Classroom).

Let’s look at the data

Here is the data sample you pulled.

sqlcleaning

To effectively create the reports your boss is asking for, you need to add a few more data points.

sqlclean1

Now, while these columns can be added manually, keep in mind a class schedule at a even a small university is at least 100 classes. And when you consider that you will have to repeat this process for every new semester, finding a way to automate this process will save you a lot of time in the end.

Step One – Get the data into SQL Server

First, let’s create a new database to work with.

Open up SQL Server Management Studio >  Object Explorer > right click  > Databases > New Database

sqlclean2

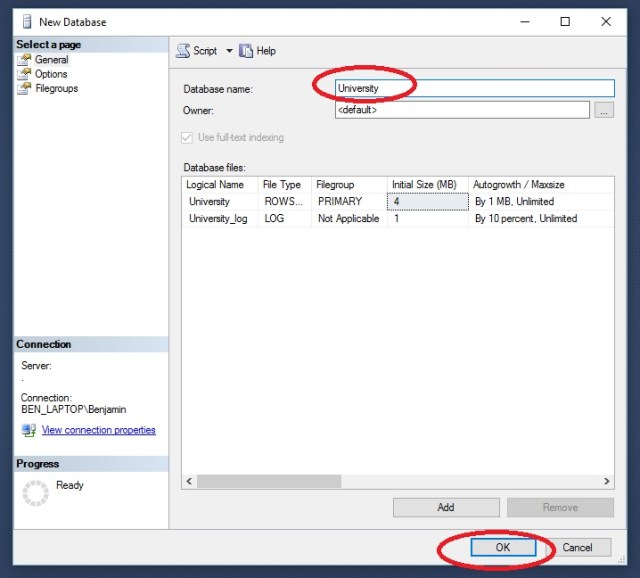
In the New Database window, give your new database the name University and click OK
sqlclean3

Right click on your new database > Tasks > Import Data

sqlclean4

On the Welcome to SQL Server Data Import  and Export Wizard click Next

On Choose a Data Source, select Microsoft Excel from the drop down. Then browse to your downloaded Excel file: dataCleanWSQL.xlsx

sqlclean5.jpg

Select SQL Server Native Client from the drop down. If your are working on the same machine as your SQL Server instance, you can just put a period “.” in Server Name. Otherwise you would need the server name. Database should be pre-filled with University.

sqlclean6

Select Copy data from one or more tables or views and click Next

sqlclean7

Take note of Destination name ([dbo].[Sheet1$]) and click Next

sqlclean8

Click Next and Finish. You will watch the process. Note how many rows transferred. This should match up to your source data.

sqlclean9

Back in the Object Browser go to University> Tables > dbo.Sheet1$. Right click and Select Top 1000 Rows.

sqlclean10

Here is the output, showing the contents of your imported data

sqlclean11

Step 2- Write the SQL Script

Load the SQL script by going to File>Open>File and choose DataCleanwSQL.SQL

While this is not an SQL tutorial, I will give a brief overview of the script file

**note GO in SQL indicates a complete block of code. This code will be completed before the script continues one to the next block of code. While it is not always needed, it is good coding practice

The first block of code: use University, simply tells SQL Server which database we are working with.

The next block: alter table, lets you make changes to an existing time. In this case, we are adding 3 column for out new data fields to go in (day, department, building).

sqlclean12

The next block is an update block. In this block we set the value of our new column day by datename(dw, [start date]). This converts the datetime stamp from [start date] to a weekday name.

The next block is a Case Statement. This works like a nested If – Then -Else statement in many languages. In this block we are stating When the value of Class column is like ‘Calc%’ ( % is a wildcard in SQL) Then set the value of the department column to ‘Math’

sqlclean13

The next code block is another Case statement. This one is using a between statement though, stating that When the Classroom column value is between 100 and 199 then set the value of Building to A

Finally
Select *
from dbo.sheet1$
displays the contents of the table.

sqlclean14

Now we have our data the way we want it. You connect you BI tool to SQL Server to work with the data, you can export it as a CSV file, or you can just copy an paste it into Excel for further analysis.

sqlclean154

Step 3: Repeat as needed

The great advantage the method above is that now we have a script we can run again over and over. So the next semester, when you download the new class listing, you don’t have to spend a lot of time on data prep. You simply have to import it into SQL Server and run your script.