Relational databases are one of the most widely used types of databases in the world. They are a type of database management system that organizes data into one or more tables, each with a unique identifier, and enforces relationships between them. In this article, we will explore what relational databases are, how they work, and their benefits.
What is a Relational Database?
A relational database is a type of database that uses tables to organize and store data. Each table contains rows of data, and each row represents a single record. The columns of the table represent different fields, or attributes, of the record.
The relationships between the tables are defined through the use of keys, which are unique identifiers that allow data to be linked between tables. The most common type of key used in a relational database is the primary key, which is a unique identifier for each row in a table. Other types of keys, such as foreign keys, can be used to link tables together.
How Does a Relational Database Work?
A relational database works by storing data in tables, each with a unique identifier. The tables are linked together through the use of keys, which allow data to be linked between tables. For example, a database for a library might have one table for books, another table for authors, and a third table for borrowers. Each of these tables would have its own set of fields, such as book title, author name, and borrower ID.
To retrieve data from a relational database, a user writes a query, which is a request for specific data from one or more tables. The database management system then executes the query and returns the requested data. The user can also modify or add data to the database by issuing update or insert commands.
Benefits of Relational Databases
Relational databases have several advantages over other types of databases. First, they are highly scalable, which means they can handle very large amounts of data. This makes them ideal for use in large enterprise systems or other applications that require the storage and retrieval of large amounts of data.
Relational databases are also highly flexible. They allow for complex relationships between data, which means they can be used to model many different types of systems. This flexibility makes them useful in a wide range of applications, from financial systems to social media platforms.
Finally, relational databases are highly secure. They include features like access control and encryption to ensure that data is protected from unauthorized access. This is particularly important in applications that handle sensitive data, such as medical records or financial data.
Conclusion
Relational databases are one of the most widely used types of databases in the world. They are highly scalable, flexible, and secure, and they allow for complex relationships between data. If you are working with large amounts of data, or if you need to store data in a secure and flexible way, a relational database is definitely worth considering.
–3 run the follow query. How many records are in the table this time?
Select * from Cust_Orders;
–4 Run the following queries. What happened to Order_ID 1502 begin transaction;
delete from Cust_Orders where Order_ID = ‘1502’;
select * from Cust_Orders;
–5 Run the following queries. Now what happened to Order_ID 1502 Rollback;
Select * from Cust_Orders;
–6 Run question 4 again, this time add a commit statement. –What happens to Order_ID 1502 now
–7 Try using Rollback. Can you undo the delete statement?
–8 Using question 2 as a guide, insert a new record, order_id =1600 — Run a Select * query to see if the record is in your table
–9 Adding a Begin Transaction statement, insert another row — This time Order_ID 1601. Run Select * to confirm
–10 Try either a commit or rollback command – What happened?
–11 — Turn the query below into a View Select s.Stud_NM as [Student Name], s.Start_dt as [Start Date], T.Subject, t1.name as [Tutor Name] from Student as s join Tutoring as t on s.Stud_ID = t.Student_ID join tutor as t1 on t.Tutor_ID = t1.Tutor_ID
–12 — Run a query from the view you just created where ——-Subject does not start with the letter G
–Bonus Question—- –13 — Run a query from the view you just created where ——-tutor name does not end with the letter b
Here are the Excel files needed to create the tables:
We will be using SQL Server Management Studio in the following lessons. If you have SQL Server installed on your machine, search for MS SQL Server Management Studio in programs or search for SSMS. If you need to install MS Sql Server: click here
Once it opens, enter the server you are looking to connect to and pick your authentication method (I’m using Windows Authentication, but you could set up a SA account and use Server Authentication)
If you properly connect to the server, you should get an object explore like the one seen below
Create a database
If you are working on work or school SQL Server, you may not have rights to create a database, you will most likely have a database assigned to you that you can build tables in. You can skip to the table creation part of the lesson.
Method 1: Using the Gui
Right click on database in the object explore, click New Database
Next name your new database, leave all other settings as is. Click Ok
Your new database’s name will appear in the list of databases now
Method 2: Use SQL
This is my preferred method. And again, we will just be using the default settings here to make this lesson easier.
Click the New Query Button to open a new query window
In the new window, type the following (note the semicolon at the end of the line, this is standard SQL and used by most system. SQL Server allows you to replace ; with the word GO. It is completely legit, I just don’t use it because no other system does either)
Create Database Test2;
Then click Execute
If you don’t see your new database appear in the Object Explorer, right click Database ,and select Refresh
Select Database to Work With
Method 1: Gui
From your query workspace, select your database from the drop down menu
Method 2: SQL Code
Go to a query workspace and type in the following code
use Test;
I tend to like this method because you can put it on the top of code you might share and it will guide people to the right database
Create Table
Method 1: Gui
Hit the + next to your database to expand
Right Click Tables > New > Table…
Now manually enter column names and datatypes for your new table
Once you are done. Click the X to close this tab. You will be first asked to save changes (yes) then you will be asked to Name you new table
Method 2: Sql Code
From your query window, use the following code to create a table:
Note I am able to assign the primary key to the first column by putting primary key after the datatype
Copy this into your SQL Server — Note you can run segments of code by highlighting them first and then hitting execute. Only the highlighted code is run.
To see if it runs successfully, expand your tables segment out on your object explorer
Let’s add another table. Copy the following code over to SQL Server and execute just like before
Now lets connect the two tables with a foreign key/primary key relationship. To create this relationship, use the following code
alter table Permit
add foreign key(ContractorID) References Contractor(ContractorID);
Note I am working with the table Permit, I am saying the Column ContractorID is the foreign key in the Permit table related to (References) the ContractorID column in the Contractor table
Add data to tables
Use the following code to add data to the two tables
Choose Microsoft Excel as Data source, browse for your file, make sure First row has column names is selected, click Next
Select SQL Server Native client as destination. If you have more than one to pick from, choose the higher number. Click Next
Leave default options – Click Next
Select the top option, You can change the destination table name if you choose.
I choose to change it and then click Next
Leave default selections, click Next
Click Finish
Make sure you got 75 rows Transferred and click close
Move data to production tables
Permit_Landing is a Landing Table. That means a table you load data into initially before it is verified and moved to production tables
Refresh your database to see the new added tables. Right click on Permits_Landing and Select Top 1000 Rows
A query window should pop up and give you the following results
The goal is to move this data to the Permit table. But note, the Permit Table has a column ContractorID that is not present in Permits_Landing. So we have to use code like seen below.
  insert into permit (PermitID, StartDate, ProjectTitle, [Location], Fee)
  select * from Permit_Landing;
Note, we have Insert Into Permit (like before) — but we now include a list columns. We only list the columns we want to load data into. Since we don’t have ContractorID column in the landing table, we will not include it here.
Also, notice the [] around Location. This is because location is a SQL key word. To let SQL Server know we are talking about a column and not a keyword, we put square brackets around it
Finally, we choose the data to load into the table using a simple select statement: Select * from Permit_Landing
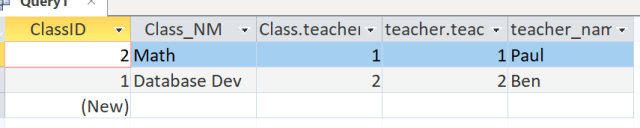
The entire purpose of related tables is that they allow you to query information from multiple tables at once. In this example we will be creating a query that looks at the Class and Teacher tables we built in the intro to MS Access Lesson: link to lesson
To start, we will select Create from the Menu bar and Query Design from the Ribbon
Next drag the Teacher and Class table over to the blank space for Query1
down below you can select the columns (fields) you want to bring in from the tables.
Next, put all the all the available columns in the Fields below
You’ll notice the Fields all have their table names in front of them in the drop down. This is common SQL notation for <table>.<field>
Right click on the query tab and select datasheet view.
Note the two tables are matched up by the teacherID in two different tables. That is the relationship. That is how relational database allow tables to interact
Lets remove the teacherID from the query
Go back to design view and uncheck the columns to hide them from the query
To see the results, click on the Query1 tab and select Datasheet view
So you can see, our query returned information found in 2 different tables
Now, let’s right click on Query1 tab and select SQL View
This is how you would write this query using SQL
Select Class.ClassID, Class.Class_NM, teacher.teacher_name — This means that we want to see these three columns. Note the table name is in front, followed by the column or field name, separated by a ‘.’ This is common practice in SQL. It tells the database which table the field is in. And in situations like the teacherID column that is found in both tables, it clarifies which one you want.
from teacher INNER JOIN Class ON teacher.teacherID= Class.TeacherID; — this is a typical join statement. It says use both teacher and Class tables, and match the records up using the TeacherID field.
Here is a code block to create a database if you want to play along
create database sandbox;

use sandbox;
CREATE TABLE employee_id (
        emp_nm varchar(30) not null,
        emp_id varchar(8),
        b_emp_id varchar(8),
        PRIMARY KEY(emp_nm) );
While loading data from Excel files and CVS files is pretty straightforward in Python, getting database from a SQL database is really a skill you should learn. SQL databases can store much more data than an Excel file and are used pretty much everywhere now.
This lesson will focus on MySQL, I have another lesson for SQL Server as well. The syntax does vary a little and if you are working with Oracle or Teradata, your syntax may change a bit as well. Luckily the Internet has plenty of resources to point you in the right direction.
Now, for MySQL, lets get started. First you are going to want to install mysql.connector (if you have the Anaconda distribution that I recommend, it comes with this pre-installed.
If you don’t have it installed, you can get it using pip or conda – I have a video showing you how to install a module here: video link — skip ahead to the 7 minute mark where I explain how to install modules
Once install, import it into your notebook
Now lets make a connection to our server: syntax should be self explanatory – localhost simply means its installed on my computer — otherwise you would provide a network path to the server there.
Let’s start by looking around- First I want a name off all the databases in my instance
Now in this example we will be working with the Sandbox database — I provided code at the top of the lesson you can paste and run in your MySQL instance to create a Sandbox database
Now lets add a new element to our connection string – database
And query the table names in the Sandbox database
Using the .execute() method, we can pass SQL commands to the MySQL instance
Below I am creating a table -> passing data to the table -> and committing the data
Without the commit() command, the data will not be saved into the table.
To add multiple rows to the table, I can use the executemany() method
Now let’s query our table. Note the .fetchall() method — this brings in all the rows from the query. I can iterate through list by running a simple for loop
I can also use the command .column_names after my cursor to return the column names of the last table I queried
Finally, we can use Pandas to put this database table into a dataframe we can work with